My first shot at a new design I got off the web. Here are the pictures and measurements of the nuc, which is a 5-frame deep frame configuration.
It is unclear from the pics what thickness of plywood he is using, so I bought a 2 x 4 foot panel of 1/4 inch at Lowes for about $8. Using the measurements given in the plans, this panel was very efficient with minimal waste, meaning that a standard 4 by 8 plywood sheet would yield four of these nucs and drive the price per nuc down.
Here is what I came up with:


This nuc is looking a little ratty, but I think next time I can build it a bit more quickly, and more neatly. In this case I got a functional and rugged nuc, certainly stronger than a waxed cardboard nuc. It took me about an hour to lay out the pieces, cut, and assemble. I was using a circular saw. if I had a table saw it would be easier, faster, more accurate.

I will, however, change the plywood I use. With this nuc I went cheap and bought the 1/4 inch stock. It was difficult to work with, forced the use of nails rather than screws (my preference) and the measurements from the web were for thicker stock and thus required some modification for my thinner panel. I will try, next time, the 15/32 inch stock. This panel was running $10 for the same size.
Pro's:
- Cheap;
- Little waste;
- Simple construction;
- 5 frame deep.
- I suck with a circular saw;
- I suck with nails;
- I think thicker plywood will solve the problem;
- Still more expensive then cardboard nuc.
I then grabbed my saw for try number 2. This is a 6-frame medium nuc that has a stacking capability and is relatively cheap. All joints are butted and screwed, and all lumber uses is stock widths. In this case, a medium depth nuc with use 1 x 8 lumber. While this is slightly deeper than a medium box, it is pretty close and brace and bottom comb should be a minimal problem. While I am describing here a medium depth configuration, it can also be modified to use 1 x 12 lumber to accommodate deep frames.

The sides of the box are stock 1 x 8. The bottom and top are stock 1 x 12. aHere are the dimensions for the basic box:

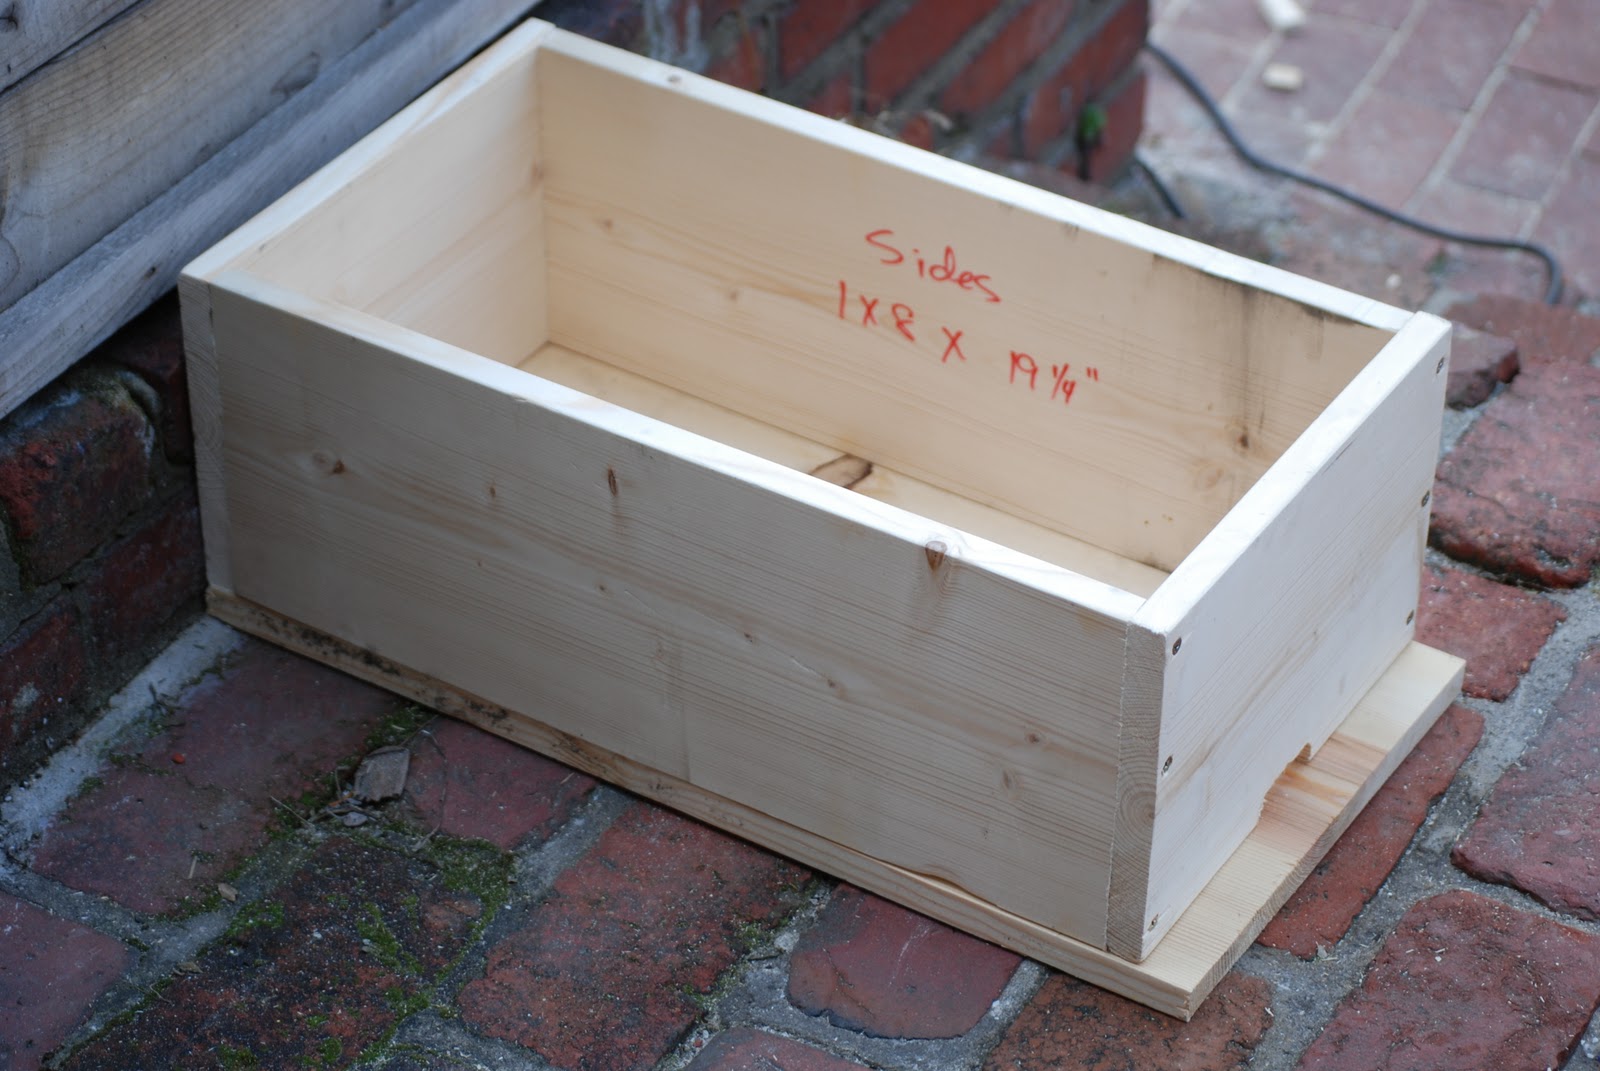
Here is where you are. Pretty simple. This took me about 10 minutes and if I was making a bunch I can imagine my per-box efficiency would improve.
Now we have to add a frame rest and a top. For the rest I use an insert of a 1/4 inch piece of scrap plywood. The top is another length of 1 x 12 with cleats on the end to keep it closed. 2 additional cleats are added to the box as carry holds. here are the dimensions:

Here is how it looks when the inserts are installed (1 inch screws):

And there you have it.
If you leave off the top and the bottom, you end up with a stackable box for nuc expansion:

Modifications I will make to this will include a cut-out in the bottom, covered with screen, to ventilate the hive. I will add cleats to the bottom to raise the bottom to allow for ventilation. On the top I will cut a hole to allow for a hive top feeder.
Not bad for a couple hours work.
NEXT TIME: I am going to retrofit a deep box to make it into a 2-colony nuc.
Jeff.
Great job and great looking nucs!
ReplyDeleteThe plywood nucs you found were, apparently, those designed by a D.Coates. I call them the Coates nucs and have built quite a number. His plans call for 15/1" interior plywood. I have found the key is taking your time. No need to complete a nuc in one day. Build several and do it in stages. Allow the glue time to dry between steps. Also, "paint" all the plys edges with Titebond III and allow that to dry prior to painting. Then, prime with a good primer and paint with a good exterior grade acrylic latex.
ReplyDeleteHere is a link to the original thread on beesource.com:
http://www.beesource.com/forums/showthread.php?238983-Easy-5-frame-nuc-plans
It's a long thread, but worth the read.
-James
That is 15/32" plywood. Sorry. -james
ReplyDeleteHow did these hold up and was there much brace comb with the sides being off a little bit?
ReplyDeleteThe circular saw can be extremely accurate and sometime more conveneint than a table saw. The trick is using a fence or straight edge or guide to run the saw along to make furniture grade cuts. Try it
ReplyDeletezhengjx20160611
ReplyDeletecheap oakleys
coach outlet
air jordan shoes
beats by dre outlet
coach outlet
air jordan femme
michael kors handbags
adidas running shoes
louis vuitton outlet
nike sb dunks
lebron james shoes 13
nike sb janoski
fit flops
nike air max 90
louis vuitton outlet online
christian louboutin shoes
kate spade handbags
coach outlet store
ray ban sunglasses
louis vuitton handbags
jordan retro 8
cheap jordans
abercrombie outlet
louis vuitton
air jordan homme
michael kors handbags
designer handbags
christian louboutin sale clearance
lebron 12
michael kors outlet
louis vuitton outlet
insanity workout
adidas yeezy
michael kors outlet online
kate spade
ralph lauren home
oakley sunglasses
juicy couture
true religion outlet
gucci outlet
We bring to you the latest and top-quality firearms ant very affordable/considerate prices! All of our guns are fully assembled, including any modifications made upon request. please contact us directly with questions or concerns prior ordering depending on current weather conditions where applicable. All Federal Firearms Licensees must be contacted before purchase so that their name may not appear when placing orders since we do use names listed only as reference during production – no warranties expressed here unless stated otherwise.
ReplyDeleteBuy Mossberg 590M 12 Gauge Mag-Fed Pump-Action Shotgun online
buy vapes-and-carts/exotic-carts/ online
ReplyDeletebuy real cookie carts online
Order mdma Online
ReplyDeleteBuy Ayahuasca Online
Buy Dried Magic Mushrooms Online
Buy Ketamine Online
Buy Microdosing Mushroome Online
Order Shroom Edibles Online
Buy Psychedelic Drugs Online
https://hippieshomes.com/
Could use crate plywood½ and paint it to preseeve.
ReplyDeleteoff white clothing
ReplyDeletejordan travis scott
off white hoodie
Travis Scott Air Jordan
goyard outlet
bape shoes
off white clothing
hermes outlet
jordan shoes
bape
oo68fe3s
ReplyDeletegolden goose outlet
golden goose outlet
golden goose outlet
golden goose outlet
golden goose outlet
supreme outlet
golden goose outlet
golden goose outlet
golden goose outlet
golden goose outlet